


Rope Christmas Tree - Easiest Holiday Tutorial EVER
This is a no knot tutorial. My sister texted me a picture of a tree she found and 2 days later, she, my niece, and I were making Christmas trees from scrap. I can give you the low-waste speech and always looking for ways to use up the little rope scraps, and I can blather about the fun of doing the tutorial, but this will be picture-heavy and word-short.
Don't think about it, just make one and have fun.
Gather Your Supplies

-
A stick: we used 3/8" dowels for the smaller and 1/2" for the bigger. They were sitting in the corner, and they were available. Length doesn't matter, in retrospect, go 3/8" or less if you can. Seriously, you could go outside and find a stick that no one's using. The straighter the better.
-
A board: I splurged and bought fancy panels from one of the craft stores for $2 each. After seeing them done, any chunk of wood would work. Doesn't have to be very big, if the rope hits the table at the end, it will help balance it. It needs to be thick enough to drill into as a base, so put that shingle back on the house.
-
Rope: Almost any twisted rope will do. The older and stiffer the better. We pulled our scraps from the 'ends bin' in the manila room, but you'll see that some pics have random bits of red polypropylene and others (not shown) had bits of cotton from trivets. Don't over think it...
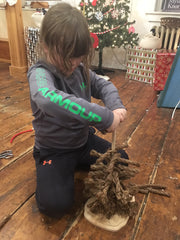
Make Your Tree


Step 1: Guesstimate the center of the board, and drill a hole for the dowel. Glue it in place with a white or wood glue. If you have a glue gun, you can put a tick of hot glue to hold it together while it sets.
Step 2: Wait until tomorrow, let the glue dry.

Step 3: Cut rope into short pieces. We made lengths from 12" down to 4". I suggest 8 or 9 of each size, lay them out by size for easy picking.
Step 4: Take the long piece of rope, give it a slight twist and slide the center down the dowel towards the bottom. Stop where you want to, and move on.
Step 4-42: (give or take) Take another piece of rope, do what you did in step 4. As you want to taper the shape, pick progressively smaller pieces of rope. Stop stacking when you get close to the top. Leave room for your ornament of choice as a topper.


Optional Step 43: (or earlier): twist the rope strands to open up the fibers to fill the tree out. Manda and I decided that we liked the look without this step, these reminded her more of the driftwood trees.
Last Step: Make it cool, make it yours. You could spray it with 'snow,' you could put little ribbons on it, dress it with your daughter's favorite craft project, or put one of our knots on it like we did. Any way you go, it's yours, and you can prove you're crafty and frugal.


Hints: Thicker ropes at the bottom look better than they do at the top. With 1/2" rope, it doesn't work well when you cut the sections smaller than 4". 3/16" rope can easily work at 4". We used a mix of random waste scraps from 3/16" diameter up to 3/4" diameter. My scrap 2" was just funny, so I included that pic.
This should be a very kid friendly project. Keep the sharp and hot bits away from everyone's person, be safe, and have fun.
Make one. Reading this took you longer than the assembly (cutting the little lengths was the only real time-consuming step).
Creativity counts, make us laugh or gasp in amazement... please give us a shoutout @MysticKnotwork on Instagram or Facebook and let us see your work.
Leave a comment
Comments will be approved before showing up.